Monday, December 31, 2007

A Gift of Rain and a Touch of Spring

Yesterday, we had almost two inches of rain. It made for a dreary Sunday, but lightened hearts in my drought-stricken area. Take a look at this photo of the Falls Lake reservoir, which provides drinking water for Raleigh and surrounding towns. Yikes! Where we used to water ski now looks like a moonscape. Two inches will not end the drought, but we are grateful for any drops that come our way.
Saturday, I was cutting different curvy border edges from freezer paper to audition for my Woodland Spring quilt when I was stricken by a stomach bug. Yuck. No more quilting for the weekend. I did get my Christmas decorations down and packed, which will free up my New Year's Day for lounging in jammies and watching football on TV.
Today I felt better, walked the dog, and enjoyed the gorgeous blue sky and mild temps. A quick survey of the yard found daffodils emerging,

pansies looking fairly perky...

is this December? My little creek out back is gurgling happily over the its cascade, and had overflowed its banks yesterday. It's been a dry bed since July, so that was a treat! I filled up the bird feeders, pinched back the pansies, and pitched the poinsettias. My cousin Lisa was here from Alaska right before Christmas, taking a break from their darkest and coldest days of winter. It was in the upper fifties here, but twenty below zero up there. She stared in amazement at my pots of flowers still in bloom. Today I noticed blooms on the blue salvia

and on a rosemary shrub...

and some of the verbena outdoors. There are buds on the camellias


and on the red maple tree.

And, a check of the bluebird boxes revealed a bluebird nest in one, and a sparrow nest in the other. No eggs---I hope they are not so confused by the unseasonable weather that they try to raise a brood in January. It is supposed to turn colder this week.

Saturday, December 29, 2007

Work in Progress- Carolina Woodland Spring

With all my Christmas projects complete, I decided to get out my green quilt named Carolina Woodland Spring and see what I can do to finish it. See my blog post of September 7 for the last photos of this piece.I added some more color to the quilted motifs, and some beads and embroidery for the centers of the dogwoods, trillium, and wood anemones.
I am trying to get it to talk to me about what else it needs. I think that next I am going to trim the outer green border to a nice organic shape. This whole thing is way too linear! But I like the way it is coming along.

Friday, December 28, 2007

Another Little Quilted Critter

At the last minute, I decided to make a little gift to take with me last weekend when we visited the McBrayers in the western part of North Carolina. Charlie's brother Richard and his wife Phylis have hosted us for many Christmases past. This is no small task, as I well know from having all of my family over for a big Christmas dinner. Richard and Phylis are cat lovers, and lost their long-time family pet, Simba, due to illness this year. I wanted to make them a Simba quilt. I did not have a picture to refer to, but remembered Simba as a big, friendly orange cat. It must have been somewhat close, because Phylis started crying as soon as she saw it. I named it Golden Memories.
The pattern is once again one I purchased from Sharon Malec, who is known for her animal portraits. This pattern was called Tabby Cat. When I finished piecing, this is how it looked.
I asked my husband if he thought it looked like Simba, and he gave a non-committal "sort of." I decided I had not used enough orange, so I got out my Tsukineko inks and went over the cat areas with several shades of orange and gold ink, including some metallic. I also gave him some eyeballs.
I thought that looked better, so I started quilting. I used a thin batt, possibly Thermolam, behind a batting of Warm and Natural. I found that when I made Miranda's horse quilt, the batting needed to be a little firmer to hang right with all the quilting I put in.

By the way, isn't that a great backing fabric? I have a good supply of hand-dyed fabric, and I think this piece was purchased from Ricky Tims. It certainly gives an art quilt a good start to have a beautiful piece of cloth to work with.

Thursday, December 27, 2007

A Beautiful Goodbye

Christmas is such a joyous time of year to be with family and friends. It seems doubly cruel when you lose a loved one at Christmas. It has happened in our family numerous times as I have lost an uncle, my grandmother, and my husband's uncle on Christmas Eve. This year I have lost my friend Pam Hogg, a lovely woman who also happens to have been a quilter. She is the wife of my husband's business partner, and we have been fortunate to have known her for the past twenty years or so. Pam has been bravely battling cancer for the past few years, and passed away on December 23.

When Pam was becoming interested in quilting, her husband Spike offered me $100 not to take her to my sewing room and show her my machine and my stash! Quilting never took over her life as it has mine, but she made a beautiful quilt and matching furnishings for their bedroom. She also made a golfing-themed lap quilt for Spike.

Over the years we have been together on many lovely trips, including two to San Francisco, where she and Spike once were stationed at The Presideo, a now-closed Army base. They were wonderful tour guides for us. This fall during her illness, she and Spike were unable to join us on the trip to New York, and we have missed her presence at the client pig-picking and other events we traditionally share. We took this picture of Spike and Pam on our first trip to San Francisco in 1997.
Today, her obituary was in the local paper. If you would like to read a story of true love, I encourage you to read this beautiful tribute written by her husband Spike.

Goodbye, dear friend. You will be missed.


Wednesday, December 26, 2007

How to Make a Fiber Shawl- Part 3: Stitching and Finishing

Hello- I am back from my holiday travels to visit family members, and am ready to post the final part of my fiber shawl tutorial.

If you recall, in Part 2, the fibers were packaged between two layers of water soluble stabilizer, basted down with water-soluble thread. For those with long-arm quilting machines, the package is pinned to the leaders. For those with domestic sewing machines, it is pin-basted into a long plastic-looking creature ready to stitch.

All these fibers must have something to hold them together once the stabilizer is dissolved. The answer is a tight network or grid of thread. You must stitch about every quarter-inch both horizontally and vertically, and then free-motion over all of the grid. If you have channel lock on your long-arm, the straight-stitching is a monotonous but easy task. Don't forget to switch to your polyester thread! On this shawl, I used a copper Bottom Line on the top and medium brown in the bottom. You get a slightly different appearance on both sides of the shawl due to the change in thread color and also the placement of your Angelina and other fibers.

A new needle at least size 4.0 (18) is helpful to pierce all the layers. I even changed mine halfway through the project.


You don't have to measure or fret about the quarter-inch spacing. Just keep stitching! Listen out for the dreaded snap of your thread breaking, which happens occasionally.


In my case, I had to roll my project to complete the stitching, since my shawl's width was wider than the throat of my sewing machine.

When you finish your grid, it is a good time to see if you need to add any fiber to an area with a "hole" or bald spot. This is easily fixed by adding more fiber over the existing project, and then adding another piece of Water-Soluble Stabilizer over that. You will need to stitch your grid over this area as well.
This step can be done at any time if your shawl needs repair!


Once the grid is done, have fun with free-motion quilting to further strengthen your network of thread. In this case, I was pretty tired of straight lines, and decided to stitch swirls and spirals of different sizes. I also do lots of tiny circles and tight zigzags around the border, but I don't try for a straight edge. I like the organic look of a curvy edge.

Okay! Finally your stitching is complete! The thing looks like some giant scaly fish lying there. Well, take that fish to water so you can reveal what is lurking beneath the plastic-looking skin. Off the machine, and into the bathtub to soak in hot water! This part looks a little repulsive as the water-soluble stabilizer becomes gobs of goo in the water. You may also see some color discharged into the bath water. Not to worry.


After a good soak and rinse, you will carefully remove your shawl by wrapping in a towel. Then lay it out flat to dry on towels. (Beach towels work well!)

When it is dry, iron the project flat. I ironed mine between two layers of a silicone sheet. You don't want the Angelina to fuse itself to your iron or table!

If you left tails for a fringe when you laid out your yarns and fibers, trim them to the length you desire. Mine are about twenty inches- lovely and luxurious! You may need to add some additional yarns by sewing, knotting, or poking through with a small crochet hook.


That's it!

Now your shawl is complete, with all its sparkly fibers shining like jewels. You are ready to be an instant fashion success at events from weddings to symphony to cocktail parties! Total strangers will come up and stare, pet your shawl, and ask how you made it! Just say, "Oh, I made it on my sewing machine!"

Good luck and I hope you enjoy your fiber shawl project!

Friday, December 21, 2007

Have a wonderful holiday

All Things Quilty is signing off for a few days to celebrate Christmas with family. I wish everyone a peaceful and safe holiday filled with love. I will post the last of the Fiber Shawl Tutorial when I get back next week.

Here is a musical gift of the season.

Tuesday, December 18, 2007

How to Make a Fiber Shawl- Part 2: Set Up

Have you decided which silk fibers and other beauties you are going to use for your fiber shawl? Or are you still drooling and slobbering over the color combinations of Tussah silk tops at A Quilter's Choice? Once you have selected your colors and beautiful fibers, you have to get your water-soluble stabilizer ready.


The shawl basically is a bunch of fibers, ribbons, yarns, and threads that are trapped between two layers of water-soluble stabilizer. Then they are stitched together in a grid format, and then free-motion quilted. Once the fibers are joined with this network of threads, the whole thing is soaked in hot water to dissolve the stabilizer.


I made my shawls on my Gammill long-arm quilting machine. This is a huge advantage when sewing long rows the length of the shawl. If you do not have one, I would recommend scaling down your project to the size of a scarf to see how you like the process.


I decided to make my shawls about 24 inches wide by 65 inches long. This is a nice size to wrap around for a little warmth. I looked in one of my favorite mail order catalogs to see the dimensions of theirs. Decide how large you want yours to be. The problem with my width is that I have to roll the project to get it that size. You might want your shawl to be the width of the throat of your machine.


1. If you are using a long-arm, mount your heavy weight water-soluble stabilizer like you would for the backing or lining of a quilt. In my case, my stabilizer was not wide enough, so I had to join two lengths together after pinning one to the top leader, and one to the other. This was way too hard. I recommend buying a big piece of WSS (water-soluble stabilizer) so you do not have to join them. Here is how mine looked after pinning together:


Then I added a second layer to make it heavy-weight, since the WSS I had on hand was lightweight. I had a whole bolt to use up! I think I would have been fine with just one layer.


2. Once your WSS is mounted, use a permanent marker like a Sharpie to draw the boundary lines for your project.


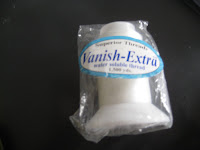
3. Load some Water-Soluble Thread, like Vanish Extra, in the top of your machine. You can use any old thread in the bobbin, because it will fall away when you soak your quilt. But, if you are smart, you can use Vanish in the bobbin, too, and not have to pull out any basting thread when you are done.


4. Now comes the fun part! Start to lay your fibers on top of the WSS. It is a good idea to have some Angelina and some silk tops on the bottom, then some yarns, then some more silk tops and Angelina. The silk tops need to be pulled apart and fluffed. You can cut the rope-like silk fibers if you don't want to use all the colors- just pick the parts that match your project.


5. Start to place lengths of yarn from one end of the project to the other. I like to make my fringe at the same time to avoid another step at the end. I leave about two feet of yarn on each side, walk the length of my table to the other side, cut off the fringe, walk back the other way, etc. Keep adding different textures and shades of yarn, and keep on adding your silks and Angelina fibers between and above them. You should use at least two packs of silk tops and one of Angelina fiber for the shawl, as well as one skein of yarn (or a variety.)


6. When you have lots of yarns and fibers covering your base layer of WSS, add a second layer of WSS to cover it. I pinned this on first, then machine-basted with the Vanish Extra thread. Go across the top, bottom, and side borders. Then, I also did a serpentine basting stitch through the whole bundle to try to keep the theads from shifting. If not using a longarm, it would be easier to pin-baste your layers together.


7. If you find that your fibers have shifted around and left some bare spots, you can add some more fibers to that area, then cover with another small square of WSS. Baste around the WSS to hold it on. You can do this at any stage of the project.


8. At this point, your project looks like a big hairy shower curtain! Your fibers are enclosed between two layers of WSS, which will keep your needle from snagging as your stitch a network of threads to hold them together.

9. Before you begin stitching, I recommend containing your fringe ends in some manner so they will not get caught up in your bobbin as you approach them while sewing. Ask me how I know! Oh yes, on my first shawl it took about four minutes to jam my machine, and about forty-five minutes practically standing on my head to pick the yarns out of the bobbin area! This time I made the WSS long enough to double over the fringe yarns and pin them out of the way. I think next time I might try putting them in a gallon-size zip lock bag.


10. One more thing before you start stitching: take the Vanish Extra thread and put it back in its bag, away from your machine! You don't want your network of stitches holding your shawl together to wash out!

How to Make a Fiber Shawl- Part 1:Gather Supplies

I made my first fiber shawl, named "Luscious," following the excellent tutorial on HGTV episode 1110 with Marilyn Badger. She actually gave instructions for a poncho made with Tussah silk tops and Angelina fiber. I loved the silky and shiny look, but did not want a poncho. Often, when I get excited about a project I see on a show, I purchase the supplies, then put them away without learning to use them. However, I finally had need of a shawl to wear to a wintery wedding last March, and made my first shawl. I am wearing it in the sidebar picture on this blog. This new shawl, Precious Gems, was just finished last week.

If you want to start making fiber garments, you need to start building a stash for different things besides fabric and thread. Usually, there is at least one fiber vendor at the quilt shows, selling ropes, skeins, and bags of yummy-looking yarns and ribbons that you have no idea what to do with. I have been buying those things for years, and using them in art quilts as trims or bindings. But, they are wonderful additions to a fiber shawl or scarf!

The supplies recommended by Marilyn Badger are water-soluble stabilizer, Tussah silk tops and Angelina fibers. I bought the first two originally from Myrna Ficken at A Quilter's Choice. Just check out the silk tops. When you click on the color selections, a new window opens with delectable shades in beautiful combinations. These arrive in baggies with rope-like bundles of fibers, dyed in variegated combinations. These are then to be fluffed out into lovely, Tribble-like puffs of silk. (Anyone else seen all the Star Treks ever made?)
Once you have decided on the lovely range of colors to use, you can add other ribbons, threads, yarns, and Angelina fibers to complement the silks. I ordered my Angelina from The Weaving Edge originally, but these are now widely available from many sources of embellishment and craft supplies. These also will be pulled apart into lovely puffs of fluff. Some types of Angelina fibers fuse to themselves when heated. When you finish your shawl, you will iron it and create lovely shimmery areas where the Angelina was used.

You will also need some lovely yarns. Marilyn used yarn for fringe, but I also used it in the construction of the shawl itself. For Luscious, I just used one skin of a mohair/acrylic blend in a cream color. For Precious Gems, I used brown fuzzy mohair, purple mohair, and several crinkly and variegated yarns. I've got to say I was a little concerned about the mohair after soaking the final project in the bathtub. This shawl smelled just like a wet dog! But it dried nicely without the offensive pet smell.
Finally, gather up any lovely embellishments you have been hoarding. I have added variegated rick-rack, hand-dyed silk ribbon, satin ribbon, metallic threads, and anything else I thought would be pretty. Just don't put anything in there that will break your sewing machine needle! You will be stitching through all this heavenly stuff. Can't add any beads or bits of metal, at least until the sewing is over!


A word about the water-soluble stabilizer: Marilyn recommended heavy weight for the base, and light-weight for the top. I purchased these from A Quilter's Choice, and they were the correct size without having to piece the stabilizer together. This was a great time-saver! For my second shawl, I decided to use a bolt of water-soluble stabilizer that I had purchased previously from JoAnn's or somewhere when it was on sale. Unfortunately, it was only 19" wide, and I wanted my shawl to be 24" wide. Also, it was light-weight. I used two layers to make the base. However, I think the purpose of the heavy-weight is to make it less likely to tear when pinned to the leaders. I think it would have been just fine to use one layer of the lightweight on the bottom layer, and maybe my thread would not have broken so much!

You will need is LOTS of polyester thread to sew the grid over your fibers. Cotton thread could shrink when soaking in the hot water. I chose to use two shades of The Bottom Line poly thread on each shawl. Using a different color on the top and the bobbin threads gives a slightly different appearance on each side. You can get The Bottom Line from Superior Threads. I used the pre-wound bobbins because they hold a LOT of thread. I was able to stitch about twelve inches along the length of the shawl before changing bobbins.

And don't forget your water-soluble thread for basting the fibers to the stabilizer. I used Vanish Extra, also available from Superior Threads.

All this makes for a rather pricey garment- another layer of meaning for the names Precious Gems and Luscious. When I wore Luscious to a cocktail party/dinner in New York recently, my husband's co-worker said I should sell the shawls. I replied that the price of materials made it not very cost-effective, and she wanted to know if I had as much as twenty dollars in it? Ha! Obviously not a crafter.

Okay, get your goodies together, and stay tuned for Part 2!


Monday, December 17, 2007

Christmas fun...and The Reveal

The Turner clan Christmas gathering is officially over- at least the part where we all gather for dinner at my house. It takes days of preparation, and then it is over so quickly! Of course, after having a week of warm days in the 70's and 80's, it turned very cold Friday night. Dave, Emily, Charlie and I were the only ones there on Friday night, and we bundled up in parkas to watch the Geminid meteor shower from our deck. That was a delightful prelude to the busy Saturday. I think about forty were there for dinner, and it rained for about the fifth time all year. The weather forecast for ice and snow in the mountains prevented my aunt and cousin from Alaska from coming down from Virginia. But all the NC mountain Turners braved the trip.

Just had to show off granddaughter Lily in her Christmas outfit! She was quite the party girl. Avery was much more sedate than usual, and in fact took a little snooze while all the company was there. The next morning, we exchanged presents with Dave and Emily, since they are going to be in Richmond for Christmas. So---I am now able to reveal my secret project from last week! Here is Emily's fiber shawl that I made on my long-arm machine. I decided to name it Precious Gems. I couldn't locate my camera while we were opening gifts, so I asked Dave to take her picture wearing it and send it to me. But here it is:
I took lots of photographs and took notes while I was making it. The plan is to post a tutorial. Frankly, I am still exhausted and don't have the energy! But check back and I will see what I can do!

Thursday, December 13, 2007

A Little Holiday Fun

It's getting down to crunch time before my holiday gathering this weekend of Turner relatives...grandkids arriving Friday afternoon and big dinner gathering for Saturday now numbering forty. So, no more blogging until Monday, probably.


Leaving you with a little silliness (Click the underlined words) sent to me by my DIL Miranda:


Move over, Janet Jackson! That's me and my hubby bustin' a move!


Wednesday, December 12, 2007

Little Projects

Here are some projects I have been doing instead of getting ready for Christmas. Well, I did finish my Christmas gift project yesterday- and wrapped all the presents. But you may remember that I have been doing some remodeling at this terrible time of year. Terrible because I started it at the beginning of deer hunting season, which means DSH was not the least bit interested in helping me with it. And terrible because I still have stuff from our bedroom piled up in the guest rooms, with company arriving on Friday. So finally, Sunday night we hung our paintings back up, and I am so happy with our serene new bedroom. I avoided painting the closet walls until after Christmas, but I did make this cute little collaged wall hook to hang in there. I used one of the prints I won from folk artist Violette, and re-collaged it with tissue paper, painted laundry sheets, ribbons, sequins, glitter, beads, fuzzy fibers, Lumiere paints, and gel medium. Now I am inspired to do some more fun things in the closet. Wait- that does not sound right! Make more creative closet organizers, I mean! Maybe I will keep it neater if I have things I love in there to hang stuff on.

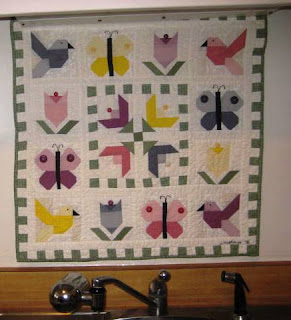
After having my spackling/sanding/painting supplies put away for all of two days, I took a look at the sink area in my kitchen and decided something must be done. For some reason, our builders put wallpaper behind the sink area with a too-short backsplash. Not a good idea, as with constant splattering, the paper starts to curl up and the sheet rock to turn brown and crumble. Maybe if we had re-caulked even once during the last thirteen years... Anyway, I peeled off two sheets of wallpaper above the sink, sanded the stuck paper off, removed old caulk, repaired sheet rock with joint compound, painted with semi-gloss enamel, and recaulked. I was going to put up replacement wallpaper in that spot, but guess what- after all these years, the old paper does not match the bright white background of the new. So, I hung this old quilt of mine over that area. It was from a pattern called something like Birds, Blooms, and Butterflies. I call it My Country Garden. I used hand-dyes in gradations of color, which has been running since 1995 onto the white background. I think I finally got all the excess dye out with Synthrapol last weekend.

Finally, my last project. This one might not get done until next Christmas. I was unpacking my Christmas stuff and came across this ugly wooden Christmas sleigh, which I remember seeing at my in-laws' house each Christmas. I was trying to think how we ended up inheriting the sorry-looking junior-high shop project, when I realized it must have been made by my own personal husband.

Unbeknownst to him, I have been beading it to the hilt, and it will someday be all shiny and sparkly. I am not much of a beader, and didn't know you had to let one side dry before turning it to do the next. All my carefully placed sparklies went sliding down the sleigh. But, I think it will be pretty when it is done.