Wednesday, November 10, 2010

T-Shirt Quilt

Here is a sports T-shirt quilt with a very clever setting, made by my customer JoAnn.


Each T-shirt has the twisted or diagonal border frame in black and white prints, which make the colorful shirts really pop.  JoAnn also used the numbers, team names, or other smaller elements at the intersection of some of the blocks.


Because of the black and white flame-looking background, as well as flames on some of the shirts, I used a meander that resembles flames.


I was a little worried about some of the slick, perforated shirt fabrics, as well as the heavy screen printing on some of them.  But, I was able to stitch into all the fabrics except for the thickest of the numerals.


If you are a longarm quilter, you may agree with me that sometimes seams on the back are problematic.  If the seams have any fullness, it can lead to pleats on the back.  Well, this quilt had quite a few back seams, as the back is entirely pieced from a variety of black and white fabrics.


Yikes!  Of course, one way to alleviate the problem of puckers or seams is to clamp the sides of the quilt.  That is one reason why we like to have an extra four inches on each side. 


Or not!  Blogger is rotating my photos again today, but in some places I only had about an inch on the sides.  Well, it came out pretty nice, I think.I have a little sidekick to keep me company for the next week or so.  Our granddog, Roo, is staying with us while his parents enjoy a trip to Florida.


 I think he is ready to go for a walk!  The temperature finally just reached 40 degrees F, so I guess we are off!

Tuesday, November 9, 2010

Art of the Carolinas

Coming up later this week is a special event in Raleigh:  Art of the Carolinas.


Sponsored by Jerry's Art-a-Rama of Raleigh, this conference will feature workshops by art instructors in many media, as well as a Trade Show with dozens of vendors of art supplies.  In addition, there will be many demonstrations of techniques and materials.

The trade show will be Friday, Saturday, and Sunday at the Hilton North Raleigh, 3415 Wake Forest Road, Raleigh, NC

This year, I decided to bite the bullet and take advantage of the opportunity to learn from nationally known art teachers.  On Thursday, I am taking a class called Painting Flowers Using Traditional and Non-Traditional Approaches with Karlyn Holman.  It includes negative watercolor painting and collage.  I wonder if I will come away with anything as lovely as this painting?


Also, I will be learning from the Queen of Zentangles, Suzanne McNeill, at her Zentangles and Watercolors workshop on Saturday.  This workshop is now sold out!


Even if you do not sign up for a workshop, there will be lots of bargains and opportunities to learn from the samples and demonstrations at the Trade Show.

Speaking of art, I finished my En Plein Air journal page spread. 


For some people, it is a big step to proclaim oneself an "artist."  For me, even signing up for art classes is a similar statement.  Big Gulp...but I am psyched!

Sunday, November 7, 2010

Cold Mountain

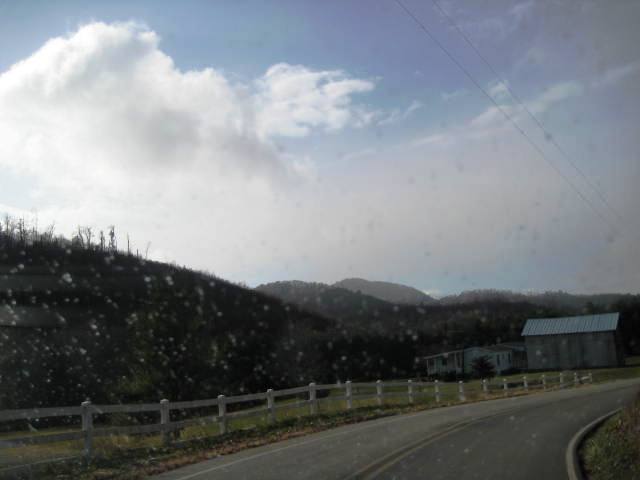
When we left home (Wake Forest, NC) to go to the mountains on Friday afternoon, it was sunny and warm, about 60 degrees F.  Around Winston-Salem, NC, it was raining hard.  Then it cleared up, and we were treated to some spectacular cloud formations as we approached the mountains.


For awhile we enjoyed the remaining autumn foliage in the foothills

Then, it started snowing!


You can see the snow on the windshield.


It did not amount to much, but it stayed fairly cold all weekend.  This morning it was a chilly 21 degrees!

We went to West Jefferson for groceries and supplies on Saturday.  A beautiful ride! This is one of my favorite spots in Ashe County, a quilt barn in a pasture with hills rising above.


There is a nice promenade of maple trees in Jefferson that are still looking colorful.


There were some traces of snow on the ground and in the Christmas tree fields.


A check of the "stealth" camera memory card showed lots of visitors in the woods behind our house since last weekend.


We had a beautiful new baby to admire at our neighbor's home...little Shelby, one month old!  She weighed only four pounds at birth, but is healthy as can be, and very sweet!

I sewed on some more beads and embellishments on my Zentangle hand art quilt while we watched football on TV and later while the guys were in the woods hunting.  I might "unsew" some of this stuff, as it is looking kind of busy.

We had a beautiful ride on the Gator this afternoon before leaving for home.  There is a patch of snow in the mountains in the distance.

This time the trip home was incredibly beautiful.  The afternoon sun lit up the golden trees along the country roads.


Before we reached home, it was dark, and the stars and a trace of the crescent moon were in the sky.  Daylight Saving Time has ended and it is darker earlier.

Friday, November 5, 2010

Whacky Ladies Quilt Bee

On the first Thursday night of each month, The Whacky Ladies Bee meets for a night of friendship and sharing, food and fun.  Last night it was out to Youngsville, North Carolina for our meeting at Marilyn's home.

Like most quilters, I love Show-and-Tell.  At bee meetings, it's great because you can view the quilts up close and ask questions of the quiltmaker.  Some of the ladies bring handwork, or bring their knitting or quilt mags.

Here is some of our Show-and-Tell from last night.

Mary makes all kinds of purses, bags, angels, wreaths, and other lovely items to sell.  (If you live near Raleigh, NC, Mary is having a holiday sale at her home on Saturday, November 20.  Contact me if you are interested in getting directions!)

She made the perfect quilt to combine her hobbies!  I'm going to look through my stash of beaded fringe and embellishments to help her trim these purses!


Here is Mary with her latest fall purse.


Mary has made several quilts using techniques from the book Nine-Patch Pizzazz by Judy Sisneros.  You make a certain number of nine-patches in various color combinations, and also use a large-scale print.  Then you play with the layout of the blocks until you arrive at a pleasing setting.

Here is Mary's purple and green quilt.


And she also had this version in warm tones of yellow, pink, and orange.


Donna Sontag brought a customer's triple Irish chain that she quilted with her computer-guided longarm.  She was hand-stitching down the binding after applying it on her longarm. That is a technique that I have not yet mastered!


Time to get ready for another mountain get-away weekend...and maybe some snow?

Thursday, November 4, 2010

Autumn-Inspired Journal Pages

The last two days have been kind of cold, rainy, and gloomy.  It helps to sit by a window with colorful blooms and foliage to gaze upon.


Although most of the leaves have fallen at our home in the mountains, they are just getting going here.  Hope the sun comes out to shine on them soon!


To counter the gray bleak weather, I got out my Moleskine journal and worked on some autumn pages. 


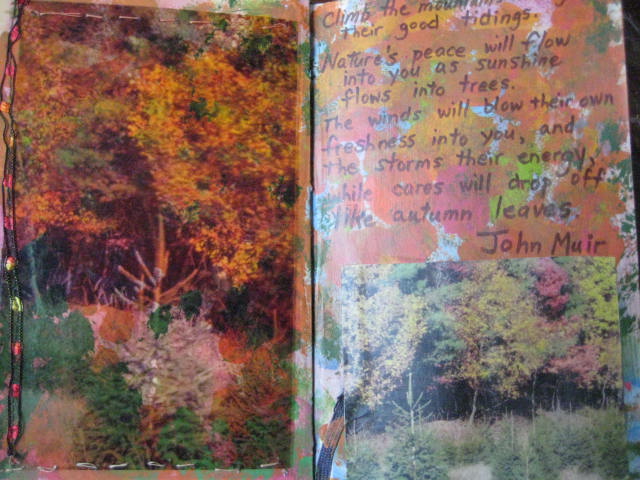
I really like this spread.  I used acrylic paints in a fall palette and just added mottled splotches all over the page to resemble an autumn forest.  On the right, I pasted in an actual photo of some of the trees bordering the Christmas tree farm that we often ride through at the top of the hill at our mountain place.


I made a transparency on the computer of the same photo, and sewed it on the top and bottom  of the left-side page using hand stitching.  Then I machine-stitched a piece of ribbon on the left edge.  This page now has almost a holographic effect.


Above the photo on the right side, I hand-printed a quotation from John Muir directly on to the painted surface. 

It reads,

     "Climb the mountains and get their good tidings. 
     Nature's peace will flow into you as sunshine flows into trees. 
     The winds will blow their own freshness into you, and the storms their energy,
     while cares will drop off like autumn leaves."

So true!

Recently, Cloth, Paper, Scissors magazine had a three-part series on journaling by Dawn Sokol.  It was called "Pages in Stages."  She now has a DVD by the same name available from Interweave Press. 


I have been more or less following her techniques.  I will paint the background pages first, then add collage elements such as images and text from magazines and catalogs.  Then, you add journaling text when you feel inspired to write something on that page.  You don't have to go in any special order.  It's really fun to work this way.  I like having some painted backgrounds ready to go when I have some time indoors to play with my pages!  I painted a lot of backgrounds with acrylics, watercolors, and water-soluble crayons at the picnic table at our mountain place.  Lots of inspiration!

I painted this background on October 10, 2010:  10-10-10!


I discovered that I loved this color palette after making this journal spread.  The photo has a bit of glare, probably due to the gloss gel medium I used on the collage elements.  (Note:  the Biltmore paper is a wine label from the Biltmore house vineyard.)


This one has lots of travel brochure information about Grandfather Mountain in Boone, NC.  I wrote some personal memories of the Blue Ridge Parkway. over the images.


On this one, I painted the background with acrylics, images about the Blue Ridge Parkway from a travel brochure, illustrations done with markers, stamping, and lettering on a collaged napkin.


Here are a couple of unfinished pages.

This one has Stages One and Two finished.  The backgrounds are painted with acrylics.  I found this great palette and paintbrush image and the text in a magazine sent to Subaru owners.  Normally that kind of mail goes right into the recycle bin.  Haven't decided what the next step on this one will be.
 

Journal pages are a great place to try out various techniques.  On this one, I used a real oak leaf both as a positive and negative image.  I printed with it on the left, and painted around it on the right. I closed the journal while the paint was still wet, and some of the orange paint colored in the leaf on the right.


Yesterday, my visiting deer reappeared in the same place in the back yard.  I thought I was getting some great pictures with the zoom lens on my husband's camera, but the battery was dying and I got nothing.  By the time I sneaked back around the house with my own little Canon, they were running away.  Can you find the deer in this picture?  (Hint:  our deer are the variety known as "Whitetail.)


His "white flag" is sticking up on the left side of the photo between two tree trunks.  That is often the view we see of deer.  By the time we know they are there, they are running away!


Tuesday, November 2, 2010

Painted Lutradur

Yesterday was the first Monday of the month, and that means a fun day with my Anything Art Bee!

The topic was Lutradur, a sort of cross between paper and fabric made from polyester fibers.

A helpful guide on using this product is Fabulous Fabric Art With Lutradur, by Leslie Riley, C&T Publishing.


Lutradur is sold in packages of 8.5 x 11 inch sheets, larger size sheets, and in various weights.  I had a package with five light and five regular weight, and our facilitator Kathy had a sample of the ultra-light.

Lutradur can be sewn, painted, run through a printer, cut, burned with heat gun, embellished with glued-on elements...and it does not fray! 

We all began by painting our sheets and stamping our sheets with an assortment of paints including Dyn-A-Flow, Setacolor, Lumiere, and regular craft acrylic paints.  We worked outside on a table covered with plastic.  When the paints dried, we added stamps with ink stamp pads.  It was fun to pool our stamps together. Some of us also chose to use a heat gun to make a lacy appearance.

Here is one of my painted, stamped, heat-zapped sheets. Notice the difference in the color hues on this white background


and the tan floor.  By the way, the "Full Moon" in the upper left is due to a jar of paint being placed on the piece to keep the wind from blowing it away.  I forgot about Setacolor having sun-printing properties!

Here is a second piece on the tan floor


on a rosy orange place mat

and again on white.


That is something to be considered as a design element due to the translucence of the fiber as well as the transparency of the burned holes.

Our project of the day was from the Leslie Riley book.  We took one 8.5" x 11" piece of Lutradur, folded it in half lengthwise and then in fourths width-wise.  We ended up with little eight-page booklets like this.

.
Some of the gals brought embellishments and began immediately to add charms and fibers.  I left my "pretties" at home, so mine is not close to being finished.  I was going for a woodsy, mountainy look, but when the paints dried, they looked more blue-green.  HMMM, maybe a Mountain Mermaid book? 


Now that I have opened my packages of plain white product and actually tried them, I think I will enjoy working with this versatile product.  I created some TAP images and will try transferring them to Lutradur for my next experiment.