Showing posts with label Anything Art. Show all posts

Monday, February 10, 2014

Lots to Catch Up On

Another week has flown by.  The Anything Art Quilt Bee met last week.

First was the reveal of our Five Funky Flowers group quilt! This picture is not good because it was on the wall at an awkward angle.


Five members of the bee each made one or more red/purple flowers, and then we divided each into four quarters and divided them back up.  After deciding how to construct our new flower from the four sections, we each added stems, leaves, quilting, and other embellishments.  We each bound our own section, and Roberta whip-stitched the five sections together.  My flower is the one in the center with the dark stem and leaves.  The quilt will be shown at the next guild quilt show in March.


Roberta Morgan showed off some of her tissue-bleed fabric projects.  That was our project last month, wherein we used wet colored tissue paper to tint commercial fabric.


This one is a landscape with amazingly strong color tones.  It reminds me of a watercolor painting.


She got some great colors on this one, too.


I finished my fabric-colored journal in time for the meeting.  The cover is quilted to a piece of Timtex interfacing, then fused to a piece of snow-dyed fabric that I made years ago.


I stamped the inside covers with botanical stamps and green ink.


I used three or four different kinds of paper to make three signatures, or sections of paper, bound into the book.  Each signature has a cover made of watercolor paper.


In keeping with the garden theme, I stamped many of the blank pages with green ink.


I recently made a whole collection of collaged tags, and added one to the journal.


Some of the signature covers are made from my grandchildren's artwork.  I have been letting them use a set of my father's watercolors when they visit.  I remember using the same set as a child.  It makes me happy to see them painting and carrying on the legacy.


I also finished my other tissue-bleed fabric project.  Here are my three little posies, now embellished with some quilting and hot-fix crystals.  I used a silk sari ribbon with silver threads to finish the edges.


I will have some more about our bee meeting and also another project I have almost finished next time.


Thursday, February 10, 2011

Abstract

Yesterday it was Part 1 of Lesson One in my Pamela Allen online art quilt class. In Part 1 we selected an artwork and attempted to translate it into fabrics.  I loved this exercise!


In Part 2, we take the same fabrics and make an abstract composition with the colors in different placements and proportions.  This was harder than I expected!  I ended up with this.


Since the original had a vast white background and a dominant blue shape, I used only a tiny snippet of white and a small piece of navy as an accent.


Abstract art is the opposite of representational.  It's not supposed to look like anything real.  I kept seeing objects as I moved my shapes around.  Oh, well, the next exercise will be a still life or landscape or something that is supposed to be representational.


One of the members of my Anything Art bee, Ruth-Ellen Flanagan,  is an excellent photographer who participates in a 365-day photo challenge.  Theme #10 was Art.  Guess what she chose for her subject matter?


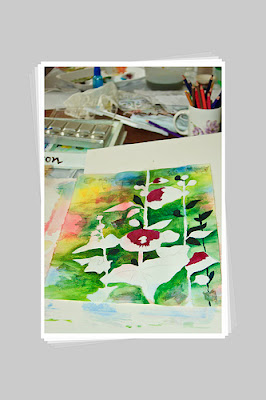
Yup, that's my kitchen table full of watercolor supplies behind the beautiful beginnings of her first watercolor painting.  She even featured Yours Truly on her blog post about our art day.


http://needlepointernc.wordpress.com/2011/02/10/day-40-theme-10-art/


And, yes it did snow last night.  This morning it is quite pretty, and the sun will soon be melting away the dusting of snow.


Tuesday, February 8, 2011

Watercolors With Friends

Yesterday, my art quilt group met at my house for a fun day of playing with watercolors.  My kitchen became an art studio!  I drew a simplified version of the hollyhocks painting I did in a class with Karlyn Holman.  Fewer flowers and leaves.


This is my pre-workshop sample.


The girls were all very receptive to trying this new medium.  We watched a little of Karlyn Holman's DVD, and used her techniques to add collaged Thai papers and sanded watercolor stencils.


I have done a similar painting four times now, and each one looks different.  Here is the one I did yesterday at the meeting.


I was proud of the girls!  Here is Roberta's painting.


and here is Tama's unfinished painting.


Everyone had their own take on the brightness and values of the colors.  It was fun, and we may have a few new fans of watercolors in the group.


While we were eating lunch, the mailman rang the doorbell.  A package from Cheap Joe's Art Stuff arrived with some fun art supplies.  My husband and I are going on a fabulous trip to Hawaii in just ten days. This will be an early celebration of our fortieth anniversary.   I bought a watercolor travel journal with Arches paper.


 And the cutest little travel set of watercolors and the water brush pen.


I don't know how much time I will spend journaling or painting while we are there, but I will have a few supplies handy if I get inspired between MaiTai's.
I have been very inspired by the travel sketchbooks from artists like Suzanne McNeil and Alisa Burke.

Here is Suzanne showing the art journal she created during a trip to Mexico.  I got to see this in person when I met her at Jerry's Artarama's Art of the Carolinas last November.  What a beautiful memory book!


Wednesday, December 8, 2010

Some Quilty Things

Brrr- it is way too cold here for this to be the South!  We have been getting this unwanted gift of cold air from our Canadian neighbors to the north!  It is unusual to have frozen ponds around here.  It is definitely feeling a lot like Christmas these days!

On Monday, it was a wonderful day with my Anything Art Bee at Ruth-Ellen Flanagan's house.  The topic was dimensional beading.  Ruth-Ellen has taken classes from Nancy Eha and others.  She had many beautiful examples of beaded pieces to inspire us, like this section of a finished piece.


She showed us how to make little beaded trees with bugle beads and seed beads, and then join the seed beads together to make a "forest."  This one is Ruth-Ellen's, not mine!


We also did  a corkscrew, and she showed us how to sew on Shisha mirrors or cabochons.  I'm not even showing you mine, because I felt like I was all thumbs that morning.

With a last name like Flanagan, you would never know it, but Ruth-Ellen is Jewish, and we had our second annual potato latke lunch after the beading lesson.  Also some kugel made in Massachusetts.  It is a sort of noodle casserole, but it tasted like apple coffee cake to me.

I have finished two customer quilts this week.  The first is another of the die-cut quilts made by Stampin'-Up demonstrator Martha Armstrong.  This time, even the fabric is a Stampin'-Up product. It coordinates with their scrapbook papers.


 It is very perky and cheerful in some non-traditional Christmas colors.  Martha chose not to use Christmas motifs for the quilting, so she could use it all year.  I did mostly spirals and swirls.  Of course, you have to go around and around the flowers to attach each tier to the quilt backing.  They are only glue-basted on when I receive the quilt.


The borders are stripes and polka dots.


The back is an even larger polka-dot print.  I used one of Signature Thread's newest colors, Misty Jade.


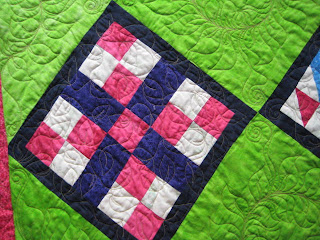
The other quilt is by my customer, Gertrude.  This is the first quilt she has ever made to keep for herself.  It was a Block-of-the-Month quilt from Bernina. 


The navy frames around the patchwork really make the colors pop against the lime green in the alternate blocks.


I did a leaf meander in the patchwork, and leafy circle wreaths in the green areas.


The borders were navy blue.  I just did some heart-shaped leaves and loops.  I neglected to get a good picture of the borders before Gertrude picked up her quilt.


The back is also lime green, but has a small print, which I like because it hides any little knots or other flaws.


I have two more small customer quilts to do before Christmas, and some small applique wall-hangings.  This weekend my kids and grandkids (and granddog Roo) are all spending the weekend, and on Saturday many of my Turner relatives are coming over for dinner.  I expect to be pretty busy the rest of this week!  How are your holiday preparations going?  Keep smiling!

Tuesday, November 2, 2010

Painted Lutradur

Yesterday was the first Monday of the month, and that means a fun day with my Anything Art Bee!

The topic was Lutradur, a sort of cross between paper and fabric made from polyester fibers.

A helpful guide on using this product is Fabulous Fabric Art With Lutradur, by Leslie Riley, C&T Publishing.


Lutradur is sold in packages of 8.5 x 11 inch sheets, larger size sheets, and in various weights.  I had a package with five light and five regular weight, and our facilitator Kathy had a sample of the ultra-light.

Lutradur can be sewn, painted, run through a printer, cut, burned with heat gun, embellished with glued-on elements...and it does not fray! 

We all began by painting our sheets and stamping our sheets with an assortment of paints including Dyn-A-Flow, Setacolor, Lumiere, and regular craft acrylic paints.  We worked outside on a table covered with plastic.  When the paints dried, we added stamps with ink stamp pads.  It was fun to pool our stamps together. Some of us also chose to use a heat gun to make a lacy appearance.

Here is one of my painted, stamped, heat-zapped sheets. Notice the difference in the color hues on this white background


and the tan floor.  By the way, the "Full Moon" in the upper left is due to a jar of paint being placed on the piece to keep the wind from blowing it away.  I forgot about Setacolor having sun-printing properties!

Here is a second piece on the tan floor


on a rosy orange place mat

and again on white.


That is something to be considered as a design element due to the translucence of the fiber as well as the transparency of the burned holes.

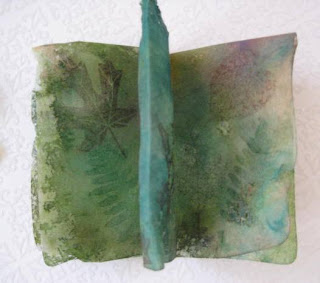
Our project of the day was from the Leslie Riley book.  We took one 8.5" x 11" piece of Lutradur, folded it in half lengthwise and then in fourths width-wise.  We ended up with little eight-page booklets like this.

.
Some of the gals brought embellishments and began immediately to add charms and fibers.  I left my "pretties" at home, so mine is not close to being finished.  I was going for a woodsy, mountainy look, but when the paints dried, they looked more blue-green.  HMMM, maybe a Mountain Mermaid book? 


Now that I have opened my packages of plain white product and actually tried them, I think I will enjoy working with this versatile product.  I created some TAP images and will try transferring them to Lutradur for my next experiment.

Wednesday, September 1, 2010

Wednesday Work in Progress-Zentangle Hand


Here is what I have done so far with the Zentangle-doodled hand.  This is a little challenge that my Anything Art quilt bee started last month.  I was fairly pleased with my doodled hand, but in what context would a severed hand appear in a quilt? I don't do macabre!
The first thing I decided was to fuse a white backing fabric to the hand, because the PDF (Prepared for Dying) fabric seemed a little thin to me.
 
I toyed with black and white solid and print combinations, but my delicate doodles seemed a little lost among the stronger prints.  To set it off, I finally fused the hand to a gorgeous hand-dyed coral fabric.


added some patchwork in bright colors that was left over from another project.  Now I had a crazy quilt going.  But first, I added a bit of black lace to the wrist to avoid the amputated hand look! Now it is a gloved hand, or at least a glove!  And some definite color pop is going on!

Some blue-green hand-dyed fabric surrounded the patchwork to give the eye a rest.

Now what?  It needs something else.  Maybe just quilt it, and then add some hand embroidery or buttons.  Or more trim, a la crazy quilt.

This is just a fun project- no stress!  Just playing!

Tuesday, February 2, 2010

More Colorful Art

The gorgeous blue skies are only a memory...the snow is still on the ground, but it is precipitating some kind of frozen stuff again today, making for a rather gray and dismal day.
To top it off, I have been working like crazy to finish the blazing stars antique quilt, and have been doing white on white micro-stippling....AARGGHH! Good part is, I am almost DONE!

Meanwhile, in the Pamela Allen class, we are immersed in art and color. As everyone has posted their favorite artists and paintings, I am learning so much. Our class is quite international, and many have included favorites from their own countries. Some of these will be used for color studies and art quilts.


John Lowrie Morrison


Tom Clark, Bethlehem

Tadashi Asomi, Afternoon Calm

Rose Walton, Three Blue Cats in my Garden

I hope you enjoyed this little art show!

Tuesday, January 5, 2010

Color Workshop

Yesterday was the first Monday of the month, which means it was the monthly meeting of AA. Anything Art, not Alcoholics Anonymous! We decided to focus on "color" this month- a great topic for a cold winter day.
We all produced our books and tools on color theory. This is a huge advantage of a group of dedicated art quilters- sharing our resources, looking at some of them before purchasing, learning what works for others.

My favorite color book is Color Magic for Quilters, by Ann Seely and Joyce Stewart.

It has all the information about color schemes, with illustrations of quilt blocks using the various combinations.


I also love the whimsical illustrations in this book, which remind me of a child's picture book (remember I am an old elementary school teacher!)

Going through my stuff, I found that I own two color wheels in addition to the ones in books. One is a print of a Judy Martin fabric color wheel from 1985, published by Quilters' Newsletter Magazine. It is on a piece of glossy card stock, so perhaps it was a gift for renewing my subscription. This one is not as useful to me because of all the muted colors from the grayed calicoes. We sure have better fabric selections nowadays!

Actually, in this photo the colors are much brighter and clearer than in actuality.

I also have a handy, six-inch purchased color wheel with a spinning triangle pointer, and a range of seven tints for each of the twelve colors on the wheel. I think I got this at Michael's Craft Store, and it is made by K1C2, LLC.


I also made a fabric color wheel using a template in the Color Magic book. It was fun searching my stash for representative colors. The colors are not true in this photo, as the Violet came out looking blue instead of deep purple. These fabrics are just mounted on card stock with glue stick.

We had a bit of show-and-tell. Ruth-Ellen showed a quilt she made from a Thimbleberries pattern, which normally are made in country tones of browns, greens, deep reds, and golds. She gave it her own spin with jewel tones and a sky blue background.

Here is another quilt of Ruth-Ellen's which is a perfect example of cool tones with a bit of warm accent color. I love this one!


Tama provided us with an interesting color activity. We each got a baggy with crayons or markers and a pad of paper. She called out seven words, and we had about ten seconds each to draw or color our reaction to the words. It was quite interesting that many of us responded in very similar fashion. Can you see the boxes and squares for the word "control," and the jagged lines for "anger?"
After lunch, we snipped fabrics and mounted them with glue-stick to a block pattern that Margaret provided. We started with a Monochromatic color scheme. Doesn't the same pattern look vastly different in each interpretation?


Then we did Analogous schemes. These are colors that are next to each other on the color wheel. Our "design wall" was Margaret's refrigerator!

Some of us also got around to a third combination, the Complementary Scheme, which uses colors opposite from each other on the color wheel. This one is mine.


It was a fun day to spend with fabric and friends, and a good reminder of some basics about color theory.

And for all those who read my last post, my Dear Sweet Husband turned out to be a pretty good sewing machine technician, although he has no experience in servicing sewing machines. He just seems to understand how things go together and how they work. He was able to remove the entire hook assembly, which on the Gammill is under the machine and requires you to crouch on the floor and peer through metal bars to access. Here is what it looks like with everything removed.

So, with the whole bobbin assembly in his hands, we still could not get the ribbon out, so he had to take the entire hook assembly apart. It contains the world's teeniest, tiniest screws. Here is the culprit: a tiny speck of pink silk ribbon that jammed up the works.


And while Charlie was available with his strong fingers and Allen wrenches, he replaced the checkspring on my rotary tension that broke off last month. And I had an extra pair of felt pads available to put on each side of the tension disk. They are supposed to be white...do you think mine were ready to replace?

A huge thank you to my husband for being my personal mechanic.