

Alert readers may remember when I purchased this fun fabric back in August. I decided to use one of the "fruit ladies" fabrics for the cover of my second journal in Sue Bleiweiss's online class. This one is a sketchbook with watercolor and drawing paper. The velcro closure is covered by a piece of fabric with a giant pear bead from one of my old necklaces. After all, I do identify most with the "pear-shaped" lady!
The inside cover has a wild peach and orange fabric that almost looks like bookbinding paper, plus a colorful, juicy faux patchwork in red, pink, orange, yellow, peach, and purple. The pocket on this one goes all the way across the bottom of the journal from front to back. I was able to sew along the lines of the print to create some of the pockets for art supplies.
 Instead of sewn-in signatures, this journal features hammered-in eyelets and removable hole-punched paper. I had no problem with the eyelets until the bottom two, when I was also going through the two layers of pocket fabric. Loose-leaf binder rings are used to hold the pages, and are decorated with strips of fabric and fiber along the spine.
The first page and several other divider pages feature painted watercolor paper.I used Setacolor sprayed or painted on, and then either used plastic wrap or paper towels to create mottling. I also added some metallic Lumiere paint to give it a gleam.
The cool text on the first page arrived at my house serendipitously when my husband picked up his annual box of wildlife calendars from the N. C. Wildlife Association. Included was a fabulous poster encouraging children to enter a wildlife art contest.
Here is the inside back cover, loaded with bookmarks, sketching pencils, and some colorful gel pens.
And here is my first page of doodled feathers, created while DH was trying out his new surround-sound speakers on the VERY loud movie Iron Man. Here is the inside back cover, loaded with bookmarks, sketching pencils, and some colorful gel pens.

And a couple of doodled bookmarks, made from leftover pieces of the painted divider pages.
 I have some coordinating Fruit Ladies fabric that might have to become a tote bag to carry additional art supplies like watercolor pencils and a water jar.

 I really like this one with the smudgy stripes.

 But, they were not dried yet, so I started laying some out on paper towels, and drying them in the microwave with a plate over them to keep the leaves from curling. Here are some marigold and pansy petals before "nuking".

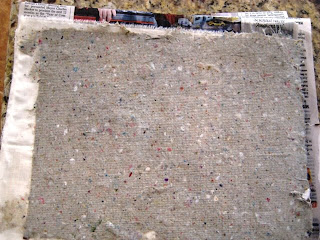 Then I dried it with the iron between sheets of muslin. This took some time. And look at the results.
 After a morning's work, only four and a half sheets of this gray, cardboard-feeling stuff that looks like I used it wipe up the leftover sweepings from the kitchen floor!


 But I do love that quilt with all the polka dot circles. Here it is with a pocket attached.
  So, I proceeded to cut my calendar picture into three strips of various widths to make my signature wraps. Then, when I lined them up with the signature pages, I realized that two of them were too narrow to use, because the holes I poked in the paper were wider apart. So, I left two signatures unwrapped, and made the extra collaged pics into pockets and bookmarks. I guess these are supposed to be bookmarks? I still don't quite get the whole journaling thing. Probably these are supposed to be something else you write on.
 I made a couple other pockets out of gusseted paper with decorative scrapbook paper glued on it. (Yes, I have some scrapbook paper.)
 I cut out the letters for LOVE and added them to this pretty scrapbook paper.
 The European trip is recorded in the long, spiral-bound books with the monkeys and the dachshund. One of them has no back, and both have rusting around the spiral binding. Strange-looking cover art, but , the dachshund is German, right? I actually bought these in Munich, and the price is marked 1.25. That would be marks, or about 75 cents back then, I think. The baby days journal is in a nicer, corduroy-bound journal. It was $1.98. There seems to be a theme to most of those entries: sleep deprivation! Ha- this should be required reading for anyone who thinks they are ready to have a baby. But it is fun to flip through and see some of the funny things Bryson was saying at age four. He called elevators "alligators," and called every bridge "undone bridges" from the "London bridges" childhood game. I had forgotten that!
