Tuesday, November 30, 2010

Nice Cozy Quilt

Here is the latest customer quilt that I finished.  This one is by my friend Jean.  I don't know the name of the quilt block.  It looks like two Delectable Mountains blocks put together.  The blue and brown palette is very cozy.


I quilted in an overall leaf meander.  I like that pattern for men's quilts, as well as anything botanical.  It gives lots of texture and adds softness to a quilt with lots of points and lines.


The border fabric ties together all the blues and browns.


The backing fabric is a luscious chocolate brown flannel.  Talk about cozy!  (The color is off in the photo- it is a rich, dark brown.  It is cloudy today and this is the best picture I could get.)


Still have four quilts to do before Christmas and lots going on.  Better get going!

Monday, November 29, 2010

Mountain Thanksgiving

I drove up to our mountain place on Wednesday morning in brilliant sunshine and gorgeous autumn foliage on the way.  I am always so happy to see this view of the dam as I cross the creek to our cabin!


Once I got there, most of the leaves were gone in the upper elevation, but it was still beautiful as always.


 It was warm and sunny Wednesday and Thursday.  What a surprise to see a street sign erected just across the road from our place:  Mistletoe Meadows Parkway!  LOL, it is just a dirt road leading to a cut-and-choose Christmas tree farm.


Charlie and I drove to Jefferson to select our tree on Thursday.  What a nice surprise to see this beautiful farm in a valley with steep pastures of contented cattle, horses, and even donkeys!


They were filling up the feed bins when we arrived, and we watched "steak on the run" as the cattle headed up the hill.


The Christmas trees were beautiful and we did not have to scamper all over the hills to find one we liked.  That's Charlie next to the one we selected- a nine-footer!

Another nice surprise at this tree farm...look at the cutie patooties who cut down the tree and baled it up for us!  (Mountain Memories Tree Farm in Jefferson, NC, if you are tree shopping!)


Charlie took this picture of me walking back among the fields of Christmas trees.


After our delicious turkey dinner on Thursday, I went to Boone, NC to visit my father on Friday.  Three of my brothers and their families met us for lunch.  Seventeen of us at the table, including five "under five!"  My niece Rachel had to work, but here is her baby Christopher with his doting grandmother, Debbie.


After lunch, I delivered the first of the two twin quilts that I finished for Debbie.  I have blogged about these before-  old tops made in the seventies, not in very good shape, but they came out so pretty!  That's me, my dad, my nephew-in-law Eric, and Debbie. 


The other one is almost done.  I couldn't quite finish in time to deliver it at Thanksgiving.

Speaking of quilts, here is a new quilt barn that I spotted in Jefferson near the Christmas tree farm.


We closed up the cabin since we won't be back for a couple of months.  I will miss our cozy retreat!

Tuesday, November 23, 2010

Happy Thanksgiving

On Thursday, we celebrate Thanksgiving in the US.  I will be driving to the mountains to join my hubby, who has been there since last week for deer hunting.  On Friday, I'm going to Boone to visit my dad and hopefully some of my brothers/nephews/nieces.

I am thankful for all my blogging friends who are always so encouraging to me!

I showed this quilt last year...or maybe its clone.  I made two identical quilts, one for my son and daughter-in-law, and one for my sister-in-law.  Maybe I will make one for us some day!  The pattern is called Turkey Feathers, and it is fun and easy to make.


Sunday, November 21, 2010

Finished Paintings

I spent some time working on paintings this weekend.  Both of my projects from last weekend's art classes are now finished!  Ta-Daaa!

Here is the hollyhock watercolor painting from Karlyn Holman's class at Art of the Carolinas.


There are some elements of collage and mixed media in this piece.  Do you see sort of shadowy images of letters in some of the background areas?  We sanded watercolor pencils over a stencil while the background was wet.  That adds a little bit of interest to the negative space.

Additionally, there are some bits of Japanese paper collaged into the painting.  You add it in while the paint is wet.  When the background painting is dry, you adhere the bits of paper with YES paste.  When you paint over the collaged paper, you get some surprises and some nice color variety.  I like the texture it adds.

And here is Miss Zentangle from Suzanne McNeill's class.  She was almost finished when I last showed her, but she had a bit of nystagmus in the eyes!  I admit to using black felt-tip marker to try to even out the eyeballs and eye shapes.


Did I mention that I have been taking an online art journaling workshop called 21 Secrets?  Lots of great information and ideas.  Here is one that I did for the " I Am Magic" workshop with Andrea Schroeder.  I fooled around with the computer, and magically changed myself into different colors.  Queen of Pandora, maybe?


I also signed up for a free art journal workshop by Tam at Willowing.  It is called Art, Heart, &  Healing. This is a four-lesson workshop that begins with a face painting page.  What an incredibly generous gift to offer this free opportunity to learn new techniques.  You can still sign up and join the other 1100 of us that are taking advantage of these online videos.

Here is my Lesson One.


Let me tell you, this page literally glows!  I stamped with Lumiere gold paint, and did some outlining and doodling with gold leaf pen.  So much fun!

It has been so beautiful here in North Carolina.  The mornings are chilly, the afternoons warm and sunny, the trees still clinging to the last of the bright colorful foliage.  It makes me happy just to walk outside!


Oh, yeah, and my college football team beat our arch-enemy North Carolina yesterday in a thrilling game, making it an almost perfect weekend!


UFO's from Marcia's Mother

On Wednesday, I met my old teaching buddy,Marcia, and her husband (of less than a year!) Jerry in Raleigh. We loaded up cartons of her mother's fabric to donate to the Capital Quilters Guild for charity quilt projects.  I blogged about the room full of fabric back in November 2009.  They finally got everything sorted out and loaded up six big cartons of fabric, threads, notions, and even a quilting frame to give to the guild.  The threads and notions, such as cutting boards, will be of great assistance to the ladies who teach quilting at the Girls' Club.


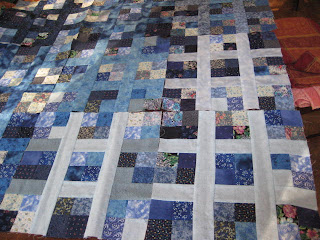
Before we drove to the Flower Cottage where the guild's fabric is stored, Marcia asked if I could make a baby quilt with some patchwork blocks that her mother had completed.  This is the block, a simple set of four-patches with sashing strips.


When we got to the Flower Cottage, we met Doris Kanoy, a guild member who is our liaison with the Flower Cottage.  (And who very kindly spent part of her birthday helping us!) When we got inside, we started looking for fabrics to go with the blue patchwork to make sashing, binding, and borders.  Doris found the box with the actual fabrics her mother had used for the patchwork!  In fact, there is probably enough for a couple more quilts there!


After laying the blocks out on my table, I see that the blue horizontal and vertical strips in each block actually make a lattice.  The blocks are so large that they don't really need sashing strips, so I think I will just use the blocks as they are.  Do you like the dark-to-light arrangement?  Or would random be more pleasing?


Marcia also found a Grandmother's Flower Garden patchwork piece.  It is long and skinny!  Doris helped us find this "cheater fabric" patchwork print that might work to add borders.


There were also a few pieces that would only need borders to make wheelchair quilts for rest home residents.  Here is a rail fence top in fall colors.  The ones that are not too floral are good to give to the gentlemen in the rest home.


Here is another top that could provide lots of cheer with its bright colors.


There was a very large pillow cover that I think I will take apart and make into a quilt.


A big thank you to Marcia's mother, Anne Vernon, for donating her fabrics and unfinished projects to Capital Quilters Guild.  Anne is no longer able to quilt, but she has left a legacy of beautiful hand-quilted bed quilts for her family.  And now she will be adding to the comfort and cheer of many others with the fabrics and supplies she has donated.

Friday, November 19, 2010

Larkin Van Horn Workshop

It has been Non-Stop Quilty Activities since Wednesday.  I will start out with the Capital Quilters Guild meeting in Raleigh, NC, on Thursday night.  Our speaker was Larkin Van Horn of Whidbey Island, Washington.  She talked about her art quilts that featured beaded medallions. 

Then, I took her workshop today called Fabric Collage.  I had seen many of Larkin's quilted fabric pieces when I took her beaded buttons workshop at the N.C. Quilt Symposium in 2009.  It is so inspiring to see her work up close.

We basically fused fabric and then assembled it into collage backgrounds.  After that, we could start adding focal points or creating landscapes or other art quilts.

Here is what I put together today.  None are quilted yet.

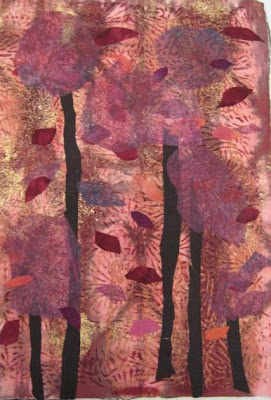
For this one, I took a piece of hand-dyed fabric that I later painted with Shiva Paint Sticks (using texture rubbing plates)  and added gold foil with Bo-Nash Powder.  I added painted dryer sheets and fused fabric leaves and tree trunks.  The hand-dyed fabric had been folded and looked like tree trunks and branches.


I put together some smaller pieces.  Larkin had printed some inspiration words on Extravorganza, which she gave to us to use.  Mine are not fused or trimmed yet.

Fabric painted with Caran d'Ache Neocolor II watersoluble crayons.


 Commercial fabrics fused together.


Green woodsy fabrics and Extravorganza printed text


It was a fun day of playing with fabric and being around fellow fabric lovers...not to mention being surrounded by Larkins' beautiful quilts.


Tuesday, November 16, 2010

Sampler Quilt

Today's finished customer quilt is a very striking black, white, and turquoise sampler quilt.

I think she said this was for her son.  She wanted an all-over pattern, just "anything."  Well, that leaves the decision process wide open, doesn't it!

Often, longarmers will choose a pantograph, which is a long paper pattern that fits on the longarm table and can be traced with a laser stylus.  I did a lot of those when I first got my machine in 2003, but never use them any more.  I like being at the front of the machine, actually seeing what is happening with my needle.  Working some of the pantograph designs actually makes me seasick sometimes!

However, I have a big Rubbermaid container full of pantographs.  I decided to look through them yesterday for inspiration.  This quilt didn't lend itself to my frequently-used flowers, or fancy spirals since it is for a man.

I pulled out a Linda Taylor pantograph, called Feather Meander.  I propped it up behind the quilt and used it as a reference while quilting.  I enjoyed this process so much more than just following the design by stylus.


Gertrude chose a dark gray thread called "Dolphin" by Signature.  It shows up nicely, but is not overwhelming.


I think Gertrude participates in a block-of-the-month club at our local Bernina store.  There are some great traditional blocks in this quilt, often enhanced by further subdividing block elements into square-in-a-square or adding additional patchwork in the backgrounds.


The backing is a bright turquoise with a slight pattern of dots.  You can see the giant curly feathers better on the back.


Add lots of echoing and curvy designs for a fun freehand design.


I think this is my last day with my granddog, Roo, as his parents are returning from Florida today.  I found a great place to walk him in a new neighborhood nearby.  The roads are paved, but there is no construction yet. 


It is still very colorful and beautiful here with the autumn colors in full blaze.

Right in front of these three sycamores, a great blue heron emerged from a pond nearby and flapped his big wings just a few feet from us.


The daily walks have been very good for me, and Roo has enjoyed all the delightful new smells and experiences!  When he got into the weeds, he looked like he was wearing his camouflage hunting suit!

Monday, November 15, 2010

Art of the Carolinas -Zentangle and Watercolor Class

Saturday afternoon it was back to the North Raleigh Hilton for Art of the Carolinas.  This time, the trade show was open, and I hoped to pick up the watercolor paints and other supplies I needed to finish my painting from the Karlyn Holman class.  She must have a lot of disciples at the show...most of the colors I needed were already sold out.  I did pick up a large pack of Arches watercolor paper, a new paintbrush, and a few tubes of paint.  I also ran into Karlyn and was able to get the instruction kit for the hollyhocks painting.

My instructor for the evening class was Suzanne McNeill, author of several Zentangle books and publisher of many how-to books.  She was in her booth at the Trade Show.  I was able to see the sketchbook she made on her recent trip to Mexico...a beautiful piece of art.  Both Roberta Morgan and I brought our Zentangle hand quilts to show her, and she took our photos to put on her blog.

I was interested to see that there is a brand new Zentangle and fabric arts book.  It was sold out at the show, but available from the website.  Apparently, others have recognized the similarity between Zentangles and quilting and embroidery designs.


Her class was very enjoyable.  She jokingly called it "Zinfandel and Watercolors,"  since it was Saturday night.  She showed us large color prints of many of her paintings. 


It was astonishing how far she has taken the Zentangle doodles in combination with painting. The tangles become blended into the backgrounds, as well as part of the garments, flowers, or other focus element.

You can see more of her work on her website.   And, she shows step-by-steps for a new Zentangle design each week.

After Suzanne showed us some examples of her work, and we had a student "show-and-tell" session, we each traced the line drawing for the lady with the scarf onto watercolor paper.  We got a large postcard with a print of the original.  Suzanne started showing us some tangles, and we added them in on various parts of our drawings.

Then, it was on to the messy part.  We thoroughly wet our drawings with sponge on front and back, and pooled watercolor paint to form a wash in the background.  At this point some of my doodles smeared, because the ink had not dried completely.  But, I think it turned out okay.   When I left the class, this was what my painting looked like.

On Sunday I filled in the rest of the Zentangles, including adding more contrast to some of the lighter tangles.  This is how it looked with all the tangles drawn.

Then, I added some shading to the face and neck, and colored in the background.  I would say she is about 99% finished now.  Maybe a little tweaking of the eyelids.


I am pleased with my Zentangle lady!